We use cookies to personalise content and to create the best experience for customers, carry on browsing if you're happy with this, or manage cookies Here.


How to install Chain Link
Our European made green PVC coated chain-link fencing and post system is the perfect choice for an attractive boundary or enclosure. Please see our easy-to-follow video below which shows exactly how to fit the complete system. We also have more detailed instructions with images below the video, including printable versions.
We carry all of our chain-link and posts in stock, and we ship to all UK Mainland addresses. We offer chain-link kits in variety of sizes click here to view kits. Alternatively, our expert sales team is on hand to answer any questions regarding the system, and to quote for everything you need to install your chain-link fence. For a bespoke quotation please feel free to get in touch contact us.
INSTRUCTIONS FOR CHAIN LINK INSTALLATION
Full guide to chain link installation - printable version; Calculate materials required for chain-link fence
This guide explains how to correctly install our chain-link fencing and post system. The first part of the guide (sections A to C) explains the various components to our chain-link fencing kit, and how to correctly install the fencing. The second part of the guide (section D) provides additional information on how to deal with different fence shapes / gradients / gaps and gates.
The key point to remember with chain-link fencing is that in order to achieve a rigid, strong fence your posts and struts must be concreted in, line wire needs to be tensioned along the fence line, and the chain-link must be pulled tight and secured correctly to the posts and line wire. If you follow the below guidance, then anybody should be able to install our chain-link fencing and post system.
SECTION A: FITTINGS
What fittings are included with the post system?
The below images show the different component parts of our chain-link post system. The type of brackets you have received will depend on the post types you have ordered.
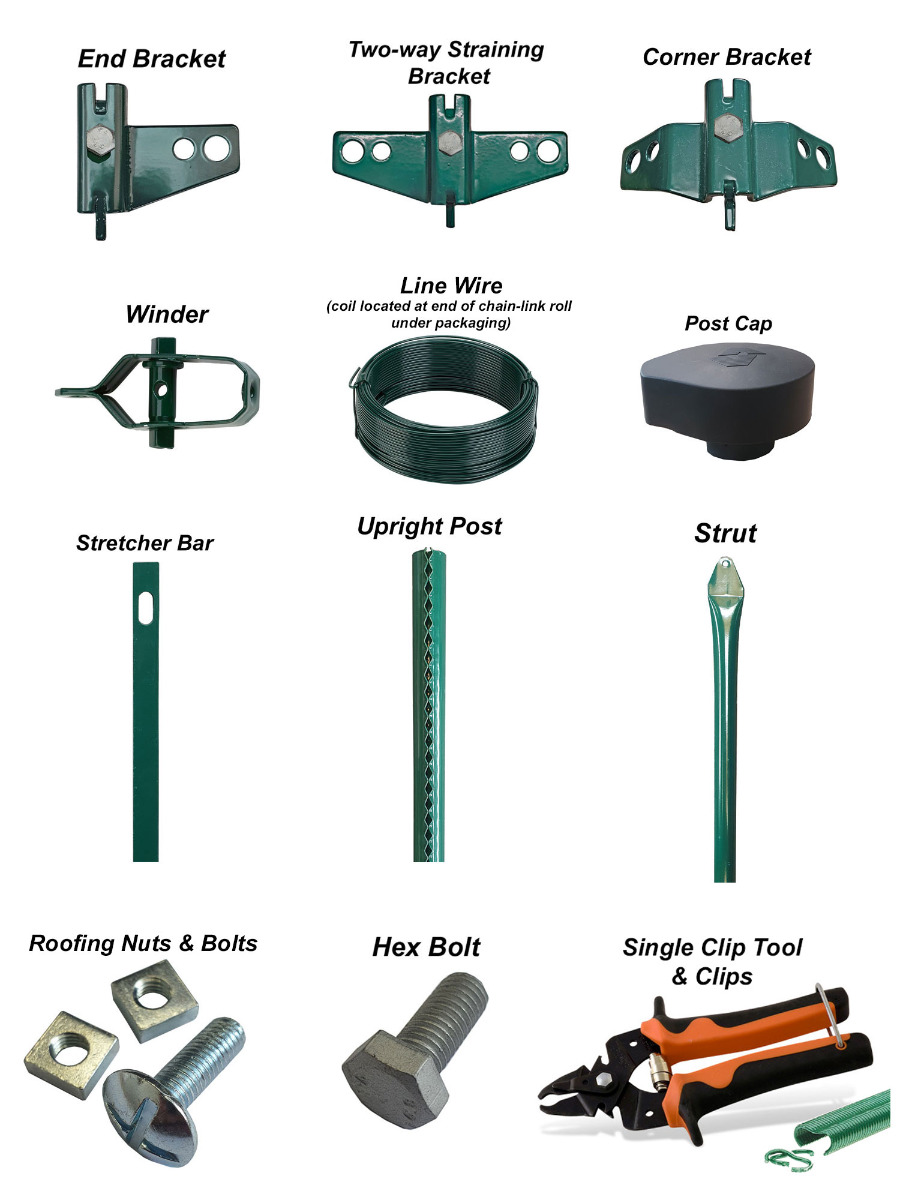
Why do all the posts I’ve received look the same?
The chain-link post system uses the same Upright Post for all post types i.e. End Post, Corner Post, Two-way Straining Post, Intermediate Post. The Upright Post is tubular, and has a row of ruts running down the entire length of the post.
To transform an Upright Post into an End / Corner / Two-way Straining Post, you need to attach the relevant fittings supplied (as explained in this guide). An Intermediate Post is simply an Upright Post with a post cap, and this post type doesn’t require any additional fittings.
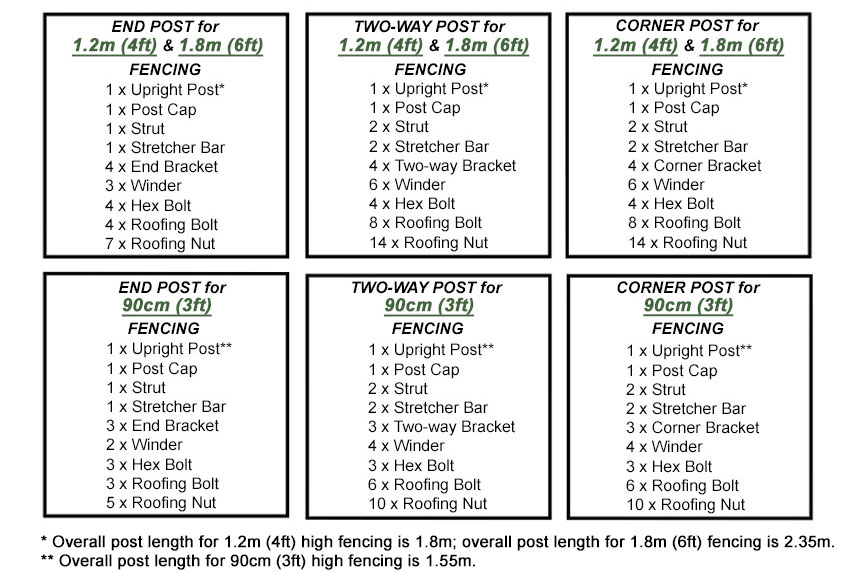
What fittings do I need for my End Posts / Corner Posts / Two-way Posts?
Set out below is a list of the fittings supplied with an End Post, Two-way Post, and Corner Post. Please note that you have fewer brackets and winders for 90cm (3ft) high fencing as you only require two runs of line wire. Additional brackets and winders are supplied with 1.2m (4ft) and 1.8m (6ft) high fencing as you require three runs of line wire.
SECTION B: WHAT ARE THE DIFFERENT FITTINGS FOR?
Details on how to attach the various fittings to your posts are provided below in Section C of this guide. However, the purpose of each fitting is as follows:
End / Two-way / Corner Brackets: Used to convert an Upright Post into an End Post, Two-way Straining Post, or Corner Post. The brackets are used to fix your winders, struts, and stretcher bars onto the post.
Struts: Fixed onto one of the brackets to provide support for your End Post, Two-way Straining Post, or Corner Post. An End Post has one strut, whereas a Two-way Straining Post and Corner Post have two struts.
Winders: Fixed onto the relevant bracket and used to tension your supporting Line Wire.
Stretcher Bars: Woven in and out of the end of your chain-link fencing roll, and bolted onto the relevant brackets to secure the chain-link to your End / Two-way Straining / Corner Post.
SECTION C: HOW TO INSTALL YOUR POST SYSTEM
Step 1: Positioning your brackets onto your End / Corner / Two-way Straining Posts
It is best to work out the position of the brackets on your posts before you concrete the posts into the ground, to ensure that your posts are buried and post-creted to the correct depth.
Brackets required for End Post: 3 x End Bracket positioned roughly at the top, middle and bottom of the “above ground” section of the post (for 90cm high fencing 2 x End Bracket at the top and bottom); 1 x End Bracket positioned approximately ¾ of the way up the “above ground” section of your post to secure the Strut into place.
Brackets required for Two-way Straining Post: 3 x Two-way Bracket at the top, middle and bottom of the post (2 x Two-way Bracket for 90cm high fencing); 1 x Two-way Bracket approx. ¾ of the way up the post for the Strut.
Corner Post: 3 x Corner Bracket at the top, middle and bottom of the post (2 x Corner Bracket for 90cm high fencing); 1 x Corner Bracket approx. ¾ of the way up the post for the Strut.
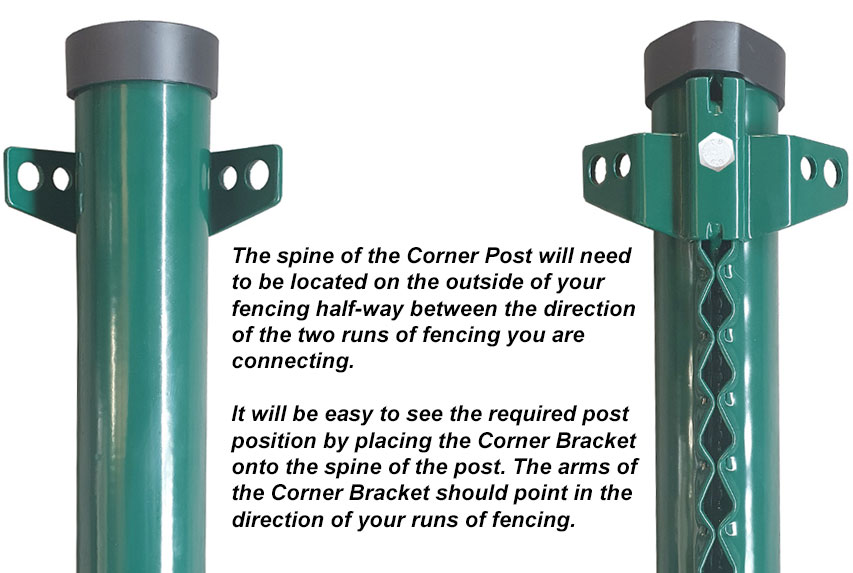
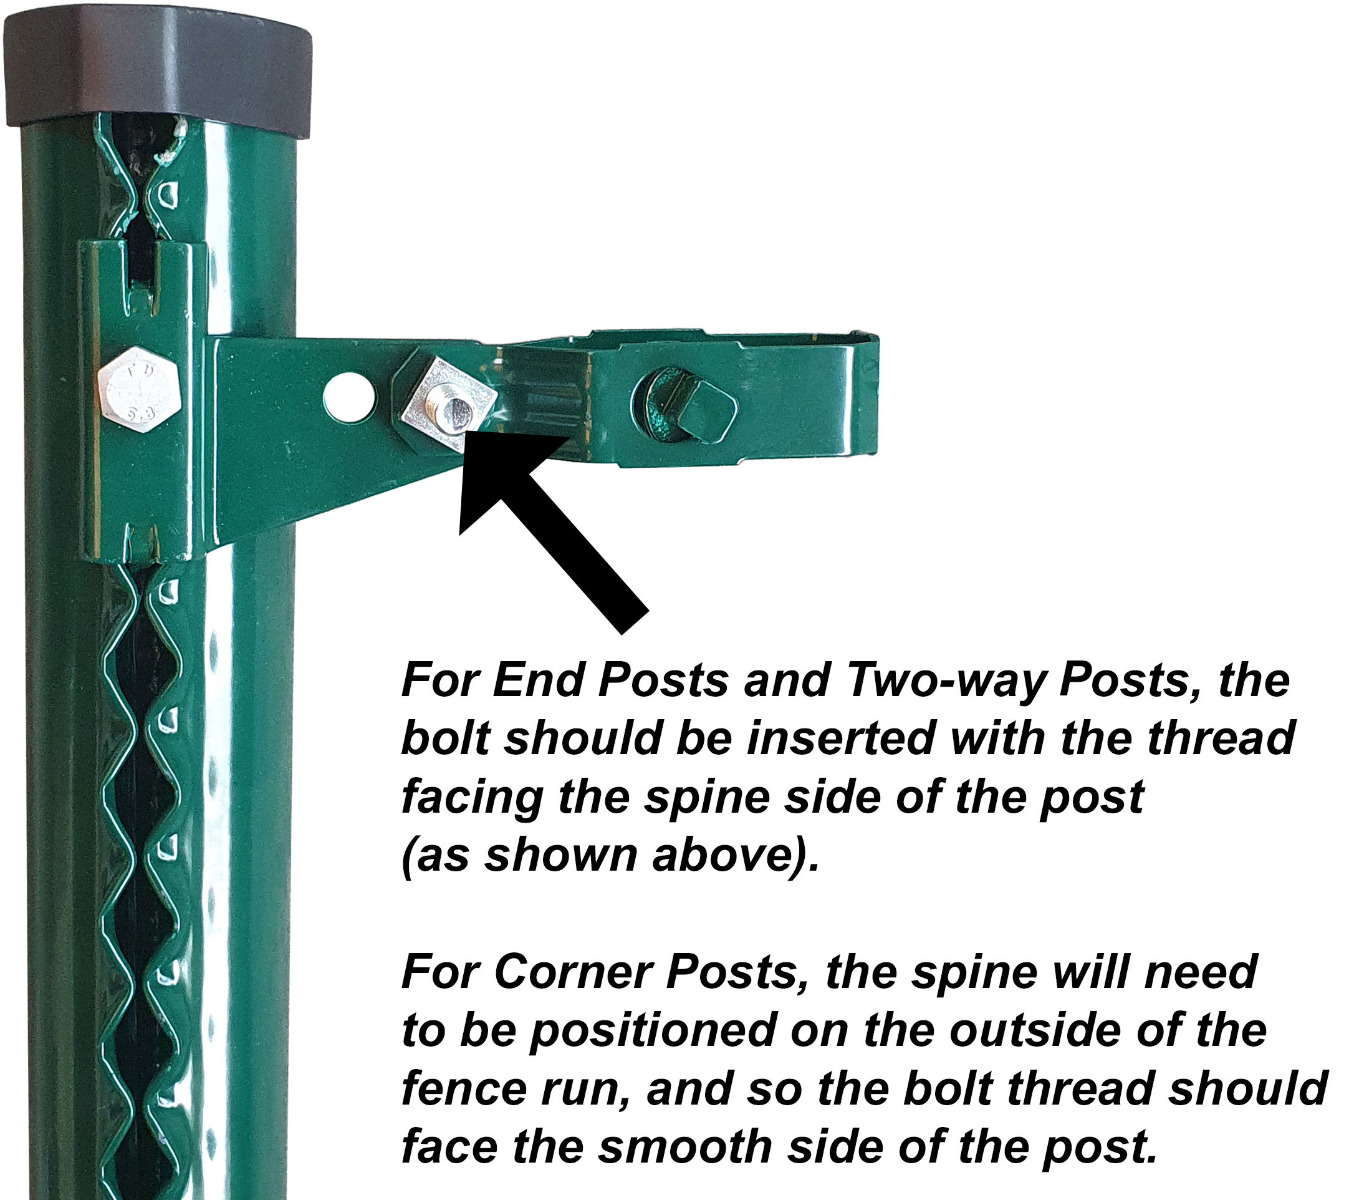
Please note that the same bracket is used for left and right Corner Posts, and so the spine of the Upright Post must be positioned on the outside of the fencing for Corner Posts. You can check the Corner Post position by placing the Corner Bracket on the spine of your post, the arms should point in the direction of your fence lines (see below image named “Corner Bracket Positioning”).
Intermediate Posts: Intermediate Posts are positioned at intervals up to 3.15m along each straight section of fencing. The Intermediate Post uses the same Upright Post as the End / Corner / Two-way Posts, but doesn’t require any brackets, winders or struts.
Bracket Positioning:
Corner Bracket Positioning:
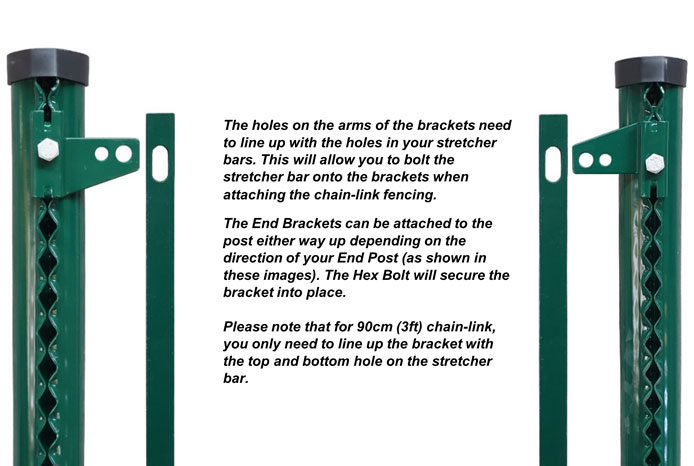
Step 2: How do I attach the brackets to the Upright Post?
As shown in the above images, the brackets fit onto the spine of the post by sliding the bracket into the spine holes until it is flat against the post.
You may need to gently tap the bracket into place using a rubber mallet or a hammer (if using a hammer, we would suggest covering the bracket with a cloth to prevent damage to the powder coating).
Once the bracket is flush against the post, you should tap the arms of the bracket downwards to secure into place. One of the Hex Bolts should then be screwed into the centre of the bracket, using a spanner, to secure the bracket. Please note that the End Brackets can be used for left or right End Posts, simply turn the bracket upside down to change direction as shown in the above “Bracket Positioning” image (when turning the End Bracket upside down, you will need to tap the bracket upwards to secure it into place).
Step 3: Post positions
Essentially, chain-link fencing is broken down into a number of straight sections of fencing which are linked together. Each section of fencing will run from one terminal post to another terminal post (a terminal post is a strutted post with fittings, and will either be an End Post, Two-way Straining Post, or Corner Post).
The maximum length we would suggest for a single straight run of chain-link would be around 25m. For straight runs longer than 25m we would recommend using a Two-way Straining Post to break the fence run down into more manageable sections. A Two-way Straining Post allows you to stop the chain-link at the 25m point, and then continue the fencing on the other side of the same terminal post (basically, very long runs of chain-link are broken down into 25m sections, or sometimes 12.5m sections if using heavy duty 1.8m high chain-link).
Chain-link fencing also requires the support of Intermediate Posts, which should be positioned at approximately 3m intervals (you can space the Intermediate Posts closer together if you wish, and can space the posts up to a maximum recommended distance of 3.15m apart). When positioning your Intermediate Posts, please bear in mind that you will need to clip the supporting Line Wire onto the spine of the post as shown in the images provided later in this guide.
As mentioned in Section C Step 1 above, extra care should be taken when positioning the Corner Posts, and you should use the direction of the Corner Brackets on the post to determine the exact spine position for Corner Posts (as mentioned above, the spine will need to be located on the outside of the corner – please see “Corner Bracket Positioning” image on page 4 above).
Step 4: Burying and post-creting your posts into the ground
When burying your posts into the ground, you need to ensure that you leave the desired fence height above ground to support your 90cm high, 1.2m high, or 1.8m high chain-link fencing. Checking the positions of your brackets, as described above, will ensure that you leave sufficient post above ground for the fittings on your End, Corner or Two-way Straining Posts.
We would suggest that you dig holes approximately 200mm x 200mm wide (or 200mm diameter if using a hole auger). The depth will depend on the height of fencing you will be installing, and positioning your brackets as set out in Step 1 of this guide will ensure that you leave sufficient post length above ground.
The posts must be concreted into the ground to prevent movement when tensioning your Line Wire and chain-link fencing. As a rough guide, you may require approximately one bag of post-crete per post. However, you should consult with the post-crete supplier for the accurate quantity required.
Step 5: Tensioning your supporting Line Wire
Once your posts have been correctly positioned and concreted into the ground, the next step is to tension your Line Wire. You will require three runs of tension wire for both 1.8m high and 1.2m high chain-link, and two runs of Line Wire for 90cm high chain-link.
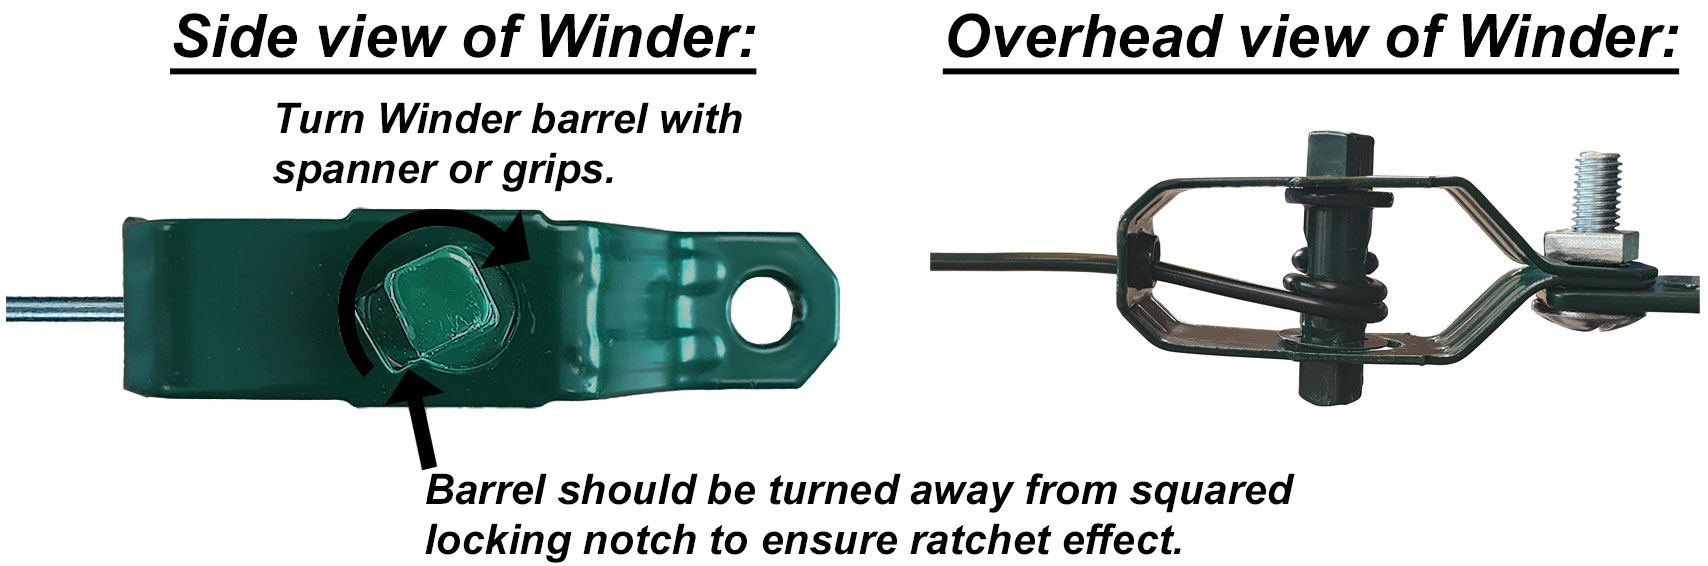
To tension the wire, you need to attach winders to your End Brackets, Two-way Brackets, Corner Brackets (please note that a winder is not required on the bracket used to fix your Struts to the post). Winders are attached using a roofing bolt and nut, and should be fixed to the outer hole on the bracket.
Once you have fixed winders to the brackets on your starting terminal post (End Post / Two-way Post / Corner Post) and to the corresponding brackets on the terminal post you are running the chain-link fencing to, you now need to tension the Line Wire. The Line Wire is threaded through the hole at the front of the winder, then through the hole in the winder barrel and wrapped a couple of times around the barrel. You then need to turn the barrel with a spanner or grips to tighten the wire, as shown in the below images.
The Line Wire should be run passed the spine side of your Intermediate Posts. Once the Line Wire has been tensioned, you use the Single Clip Tool and Clips to secure the Line Wire onto the spines of the Intermediate Posts, as shown in the below image.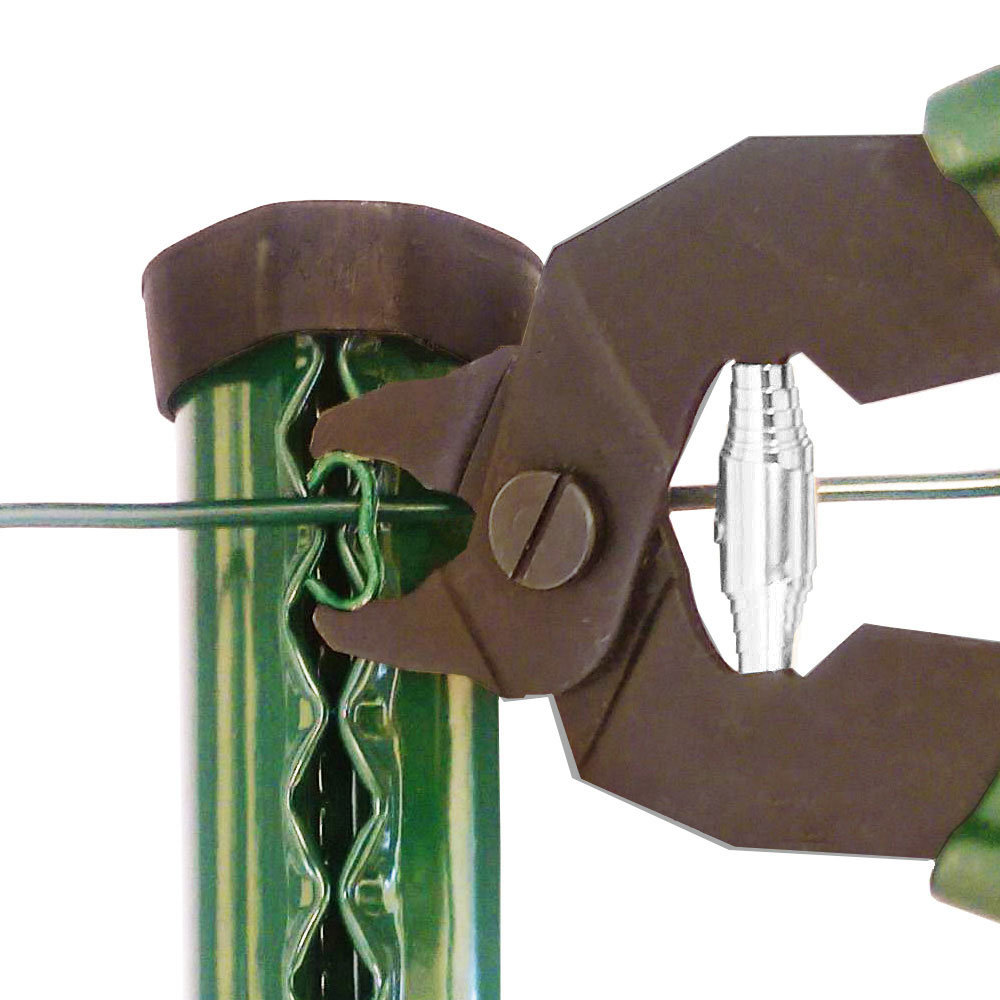
Step 6: Attaching the chain-link to your starting post
Once your line wire has been tensioned and fixed to your Intermediate Posts, the next step is to attach your roll of chain-link fencing to your starting post. It is best to keep the roll of fencing rolled up during this process, as the wires can easily snag if you attempt to unroll the chain-link along the ground and then lift it to the posts.
First, you will need to remove the wires wrapped around the roll holding the fencing together. Then, hold the roll of chain-link upright against your starting terminal post (End Post / Two-way Straining Post / Corner Post) and weave one of the Stretcher Bars in and out of each hole at the start of the fencing as shown in the below image. The Stretcher Bar is then fixed onto the same Roofing Bolt used to hold your winders onto the brackets, and a second Roofing Nut is used to hold the Stretcher Bar into place (as shown below).
Step 7: Fixing the chain-link to the Line Wire and Intermediate Posts
Now that your chain-link is fixed to the starting post, you simply unroll the chain-link along the tensioned line wire. As you move along the line wire, you should use your Clip Tool and Clips (or your FP222 auto-loading hog ring plier if purchased) to clip the chain-link fencing onto the line wire as shown in the below image. You should use approximately 3 clips per metre on each run of line wire.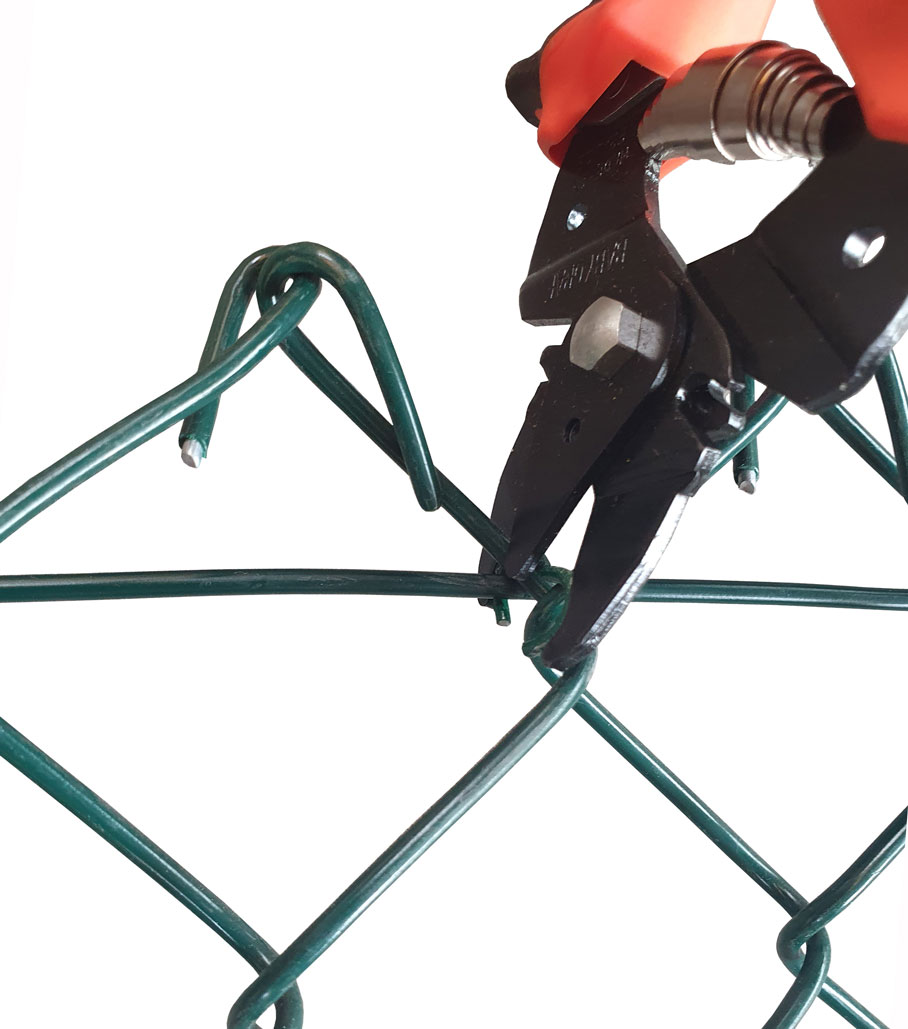
The chain-link does not need to be fastened to your Intermediate Posts. You run the chain-link past the Intermediate Posts, and it is only clipped onto the tensioned Line Wire.
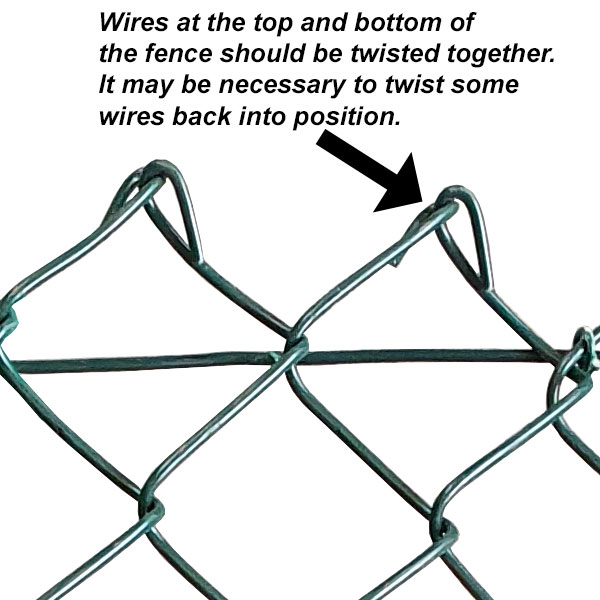
PLEASE NOTE that as chain-link is a woven product, some of the vertical wires may have twisted out of place slightly during transit. This can easily be fixed by twisting the wires back into position and ensuring that the loose wires at the top and bottom of the fencing are twisted together (as shown in the below image). This process is simpler if you do this as you unroll the fencing along the tensioned line wire.
Step 8: What to do when you get to the end of your section of fencing
At the end of each straight section of fencing, you need to fix the chain-link to the terminal post (End / Two-way / Corner Post). Essentially, you just repeat the above process of inserting the stretcher bar and bolting this onto the relevant brackets fixed to the terminal post. To ensure that you install a rigid fence you will need to pull the chain-link taut when attaching the second stretcher bar, however the end of your run may not correspond exactly with the end of the roll of chain-link and so you may need to shorten / lengthen the roll.
How do I shorten my roll of chain-link fencing?
As chain-link is a woven product, there is no need to cut the fencing with wire cutters. Instead, you can separate off a section of fencing by untwisting the wires on the diamonds at the top and bottom of the fencing (shown in the above image) with a pair of wire grips. One of the wires will then twist out of the fencing like a corkscrew, which will separate off the chain-link at that point.
How do I lengthen my roll of chain-link fencing?
If your fencing run is longer than the remainder of your roll, you can attach a second roll of chain-link by weaving the fencing together (this is the reverse of the shortening process). You untwist one of the chain-link wires, as described above, and use the loose wire to weave the two rolls of chain-link together. There is a useful YouTube video which demonstrates how chain-link sections are separated and woven together at the following link https://www.youtube.com/watch?v=nQZ-y8E17UU
a.) Straight run: To install a straight run of fencing you will need two end posts (one at the start of the run and one at the end of the run), and intermediate posts spaced up to 3.15 metres apart. For longer runs of chain link you may wish to insert a straining post (a straining post is used when the weight of the chain link cannot be stretched over the full distance, for our standard weight chain link this is 50 metres, for our heavy duty chain link and our 2400mm (8ft) high chain link this is 25 meters).
b.) L-shaped fence: To install an L-shaped run of fencing you will need two end posts (one at the start of the “L” and one at the end of the “L”), a corner post for the 90 degree change in direction, and intermediate posts spaced up to 3.15 metres apart;
c.) Inserting a gate: To insert a gate in a run of chain link fencing, you will need two additional end posts (one must be positioned on either side of the gate posts). Essentially you are stopping the run of fencing with an end post, inserting the gate, and then starting a new run of chain link on the other side of the gate;
d.) Enclosures: To install a square or rectangular fully enclosed area you will need 4 corner posts with intermediate posts spaced up to 3.15 metres apart. Please note that you will also need two end posts to create an entrance to the area (see “Inserting a gate” above);
e.) Dog legs and curved fence lines: To ensure that you have a rigid fence, chain link fencing must be tensioned properly. If there isn’t enough tension in the fencing then it will sag and possibly snag. For best results in tensioning the fencing, the fence line should be kept as straight as possible. If you have a curve or dog leg in your fence line then it may be necessary to stop the fencing with an end post, and restart it at a slightly different direction (you can restart the fencing by inserting another end post). For severe curves in the fence line, it may be necessary to erect the chain link in several small sections to account for the change in direction;
f.) Gradients: Where you are installing the fencing on a gradient, the change in height can make it difficult to retain the tension in the fencing. In order to compensate for this change in height, you can tweak the installation process. The key is to ensure that the bottom edge of the chain link fence runs parallel with the ground. The first step is to concrete in your posts and tension the line wire in the usual way (you will need to position the winders so that they are pointing in the direction of the slope i.e. ensuring that the tensioned wire remains parallel to the ground). Once your posts are concreted in, you should begin with the end post at the top of the slope. Keeping the chain link rolled up, take the top corner of the chain link and clip it onto the top run of line wire (using your hog ring plier). Make sure that you use a few hog rings to ensure that the chain link stays in place.
The direction of the chain link needs to remain parallel to the ground. In order to achieve this, you will need to ensure that the bottom edge of the chain link runs in line with the bottom run of tensioned line wire (i.e. so that the roll of chain link is pointing down the slope). This will result in the bottom left corner of the chain link overhanging the upright post. This overhang will be a triangular shape on the far side of the end post / two-way post. Once you have found the correct angle for the chain link, you will need to insert (weave) the stretcher bar through each hole in the chain link at the point where the chain link is in contact with the upright post i.e. the stretcher bar should remain parallel to the upright post, so you will be inserting it on the bias on the chain-link itself. You should then bolt the stretcher bar to the brackets on your post (this will secure the fencing to the end post, leaving the excess triangle of chain link on the other side of the post). You can now cut off this excess of chain link (the triangle) using wire cutters. To neaten up any raw edges, you should twist them around the stretcher bar. You can continue to fix the roll of chain link to the line wire as described in this guide below. Finally, repeat this process at the other end of your run of fencing.